
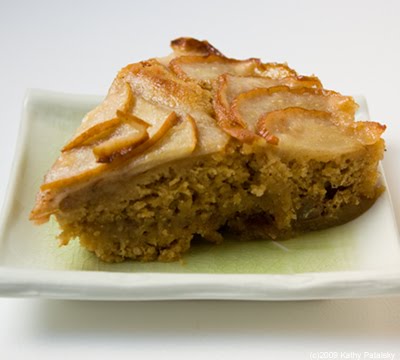
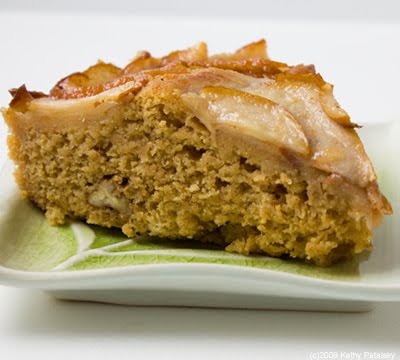
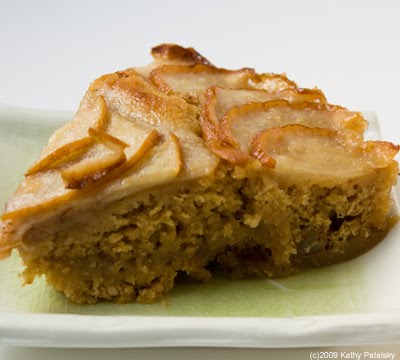
 There's no need to feel upside-down after a dessert treat. This recipe will leave you feeling right-side-up. My Pear Right-Side-Up Cake is a super moist, perfectly sweet, low-fat dessert or tea cake that will not only taste delicious, but look quite charming. Lovely layers of elegant bosc pears line the top of this tart-like cake. Serve with a hot steamy cup of tea, coffee or a spicy hot soy chai.
Low-Fat Bliss. The only added fat in this recipe is 1 tablespoon of vegan buttery spread and ½ cup of pecans folded into the batter. If you'd like to make a fat-free version, you are certainly welcome to. This 'healthier option' dessert is perfect for those guests who may not want to splurge on a more decadent vegan dessert. (However, I'll also include a few modifications for those of you who do want a more decadent version of this pear cake.) Get my recipe...
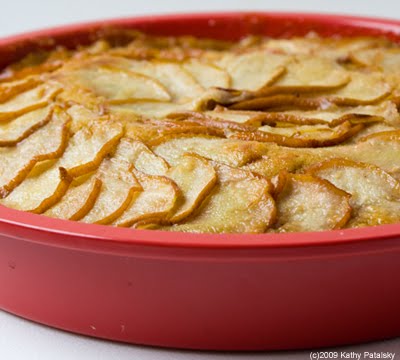
Perfect Pears. Perfectly mandolin-sliced pears are the secret to this pear tart. Thickly-sliced pears won't cut it.
 Moist Secret. My secret for a low-fat, yet super moist cake is the butternut squash puree. For super moist baked goods, it just works perfectly every time. Plus it adds in a nice dose of healthy butternut squash fiber and vitamin A.
 For the More Decadent Bunch. If you want to make this tart a bit more decadent, you can as well. Simply replace all the 'soy milk' with 'soy creamer'. And add 2 more tablespoon of vegan buttery spread to the soaked pears. This will create a more decadent cake. But either option fat-free, low-fat or decadent, will be delicious. These pears deliver...
Pear Right-Side-Up Cake
vegan, makes 1 tart
Soaked Pears:
2 large ripe bosc pears, thinly sliced (or 3 medium pears)
½ cup organic apple cider
¼ cup fresh tangerine or orange juice
¼ teaspoon grated ginger, fresh
¼ teaspoon tangerine or orange zest
½ teaspoon cinnamon
1 tablespoon vegan buttery spread
optional: 1 tablespoon brandy
Batter:
1 ¾ cups whole wheat flour
¾ cup vegan sugar, evaporated cane juice crystals
1 tablespoon baking powder
1 teaspoon cinnamon spice blend
½ teaspoon salt
½ teaspoon grated fresh ginger
1 ½ cups organic butternut squash puree, canned
1 cup liquid from the drained pears
¼ cup soy milk
1 teaspoon vanilla-bourbon extract
*TJ's brand, or just use plain vanilla
Fold in: ½ cup whole raw pecans
Coating:
¼ cup maple syrup
1 teaspoon vanilla soy milk
light sprinkle of sugar
Directions:
1. Wash your pears. Remove any soft or brown spots. Mandolin slice them into very thin slivers. You can have a few that are oddly shaped, but make sure to also get a few that have a pretty pear shape to them-these can be your top layer pears.
2. Add all your pears to a large bowl. Also add in your cider, citrus juice, zest, ginger, cinnamon and vegan buttery spread. Omit the spread for fat-free. Add more spread for a more decadent cake. You can also add in a tablespoon of brandy if you'd like.
3. Toss the pears gently in the liquid and set them aside to soak for at least 15 minutes.
4. Start your batter. Mix all the dry ingredients in a large bowl: flour, sugar, salt, cinnamon and baking powder.
5. Next, drain the soaked pears and add that drained liquid directly to the batter mixing bowl. Next also add in the remaining wet ingredients: butternut squash puree, grated fresh ginger, soymilk and vanilla extract. Gently mix until you get a fluffy, well-mixed batter. Lastly, Fold in the raw whole pecans. (You can chop the pecans if you'd like-or simply add them whole like I did.)
6. Pour your batter into a lightly canola-oil-sprayed 9 inch cake pan or a similar sized baking dish. Pour about a 1 ½ inch thick layer of batter. Spread it out evenly with the back of a spoon-as the batter should be quite thick and fluffy. Make sure to leave room for layering the pears on top - about ½ inch. note: You may have a bit of batter leftover, you can use this to make a separate smaller tart - or a few muffins. (Larger cake pans will not have leftovers.)
7. Layer the pears. You will place about 3 layers of pears on top. You can start off with the oddly shaped pears, and work your way to a pretty design of the 'pear-shaped' pears. I like to layer from the outside-in.
8. Lastly, pour your 'topping' liquid mixture over top the pears, and add a very light sprinkle of sugar on top as well.
9. Place in a preheated 350 degree oven for 30 minutes. Or until the pears look fully baked and the outer edges of the cake start to pull away from the pan. For the late 5 minute of baking, turn the oven on high broil to allow the top pears to caramelize and brown up a bit. This will also prevent 'mushy pears'.
10. Allow to cool. You can serve warm, but I actually prefer this cake chilled in the fridge overnight. It allows the cake to firm up and the pears to really soak into the top layers of the cake - in a right-side-up way. Remove cake from fridge about 15 minutes before serving.
Yummy!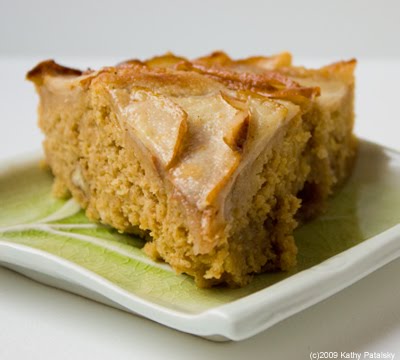


Anonymous says
I made the pear cake this morning. This has a great combination of flavors. Unfortunately I don't think mine cooked all the way through (although it still tastes wonderful ;-)). The edges moved away from the side of the pan, but when I cut into it later, the part of the cake underneath the pears seemed uncooked. Do you think I should put it back in the oven (or does the suggestion make you cringe?-I'm not an experienced cook!)
Kate says
So beautiful! I always love seeing your pics on foodgawker and being like "that looks familiar."